Trimming Pet Nails at Home
by admin in Pet Care Basics 214 - Last Update December 5, 2025

I\'ll be honest, for years the thought of trimming my dog\'s nails sent a shiver of anxiety down my spine. The click-clack of his long nails on our hardwood floors was a constant reminder of a task I dreaded. I was terrified of hurting him, of cutting the quick and causing him pain. After one too many stressful and expensive trips to the groomer, I decided I had to learn. It wasn\'t just about saving money; it was about building trust and making a necessary task a calm, bonding experience rather than a traumatic one.
Why regular nail trims are non-negotiable
Before I committed to doing it myself, I didn\'t fully appreciate how important nail care was. I learned that overgrown nails can do more than just scratch floors. They can force a pet\'s paw into an unnatural position, which over time can lead to joint pain, arthritis, and even skeletal issues. For my cat, long claws meant getting snagged on furniture, which was a constant source of stress for her. Realizing it was a matter of their long-term comfort and health was the final push I needed to take control of the situation.
Gathering the tools that work for you
Walking into a pet store can be overwhelming. There are so many types of clippers. I\'ve tried a few, and here’s my take. For my large dog, I found that the plier-style (or scissor-style) clippers give me the most control and a clean cut. For my cat and my smaller dog, the small guillotine-style clippers are perfect. The most important thing I discovered is that sharpness is key. Dull clippers can crush the nail instead of cutting it, which is painful. I also keep two other things in my kit at all times: a small bag of high-value treats and styptic powder. Trust me on the styptic powder; you want it *before* you ever need it.
My step-by-step method for a stress-free trim
This is the process I\'ve refined over the years that works for my pets. It\'s all about patience and positive association.
Create a calm and comfortable space
I don\'t make a big deal out of it. I wait until my dog is relaxed and sleepy, usually in the evening when we\'re all settled down. I sit on the floor with him in a well-lit area, armed with my tools and treats. I spend a few minutes just petting him and gently handling his paws before I even bring the clippers out.
Finding that dreaded quick
This was my biggest fear. The quick is the bundle of nerves and blood vessels inside the nail. On my dog\'s light-colored nails, it\'s pretty easy to see—it\'s the pink part inside. I simply trim the white tip before the pink. My cat, however, has black nails. For her, my rule is to trim tiny bits at a time. As you get closer to the quick, you\'ll see a small, dark circle appear in the center of the cut nail surface. That\'s your sign to stop. It\'s always better to trim too little than too much.
The \'little and often\' approach
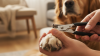
I never try to do all four paws in one sitting. That\'s a recipe for stress. I might do one paw, then give lots of praise and a special treat. Sometimes I\'ll just do one or two nails a day over the course of a week. The goal is to make it a normal, non-eventful part of our routine. I take a tiny sliver off the end, always cutting at a slight angle parallel to the bottom of the nail.
What to do if you make a mistake
It happened to me once, and my heart sank. But panicking only makes your pet more anxious. I calmly took a pinch of the styptic powder and pressed it firmly onto the bleeding nail tip for about 30 seconds. The bleeding stopped almost immediately. I gave my dog his favorite chew, and he forgot about it in minutes. While it\'s best to avoid, know that it\'s a fixable mistake. Of course, if bleeding ever seems excessive or doesn\'t stop, a call to your vet is the right move.