Trimming Dog Nails Safely at Home
by admin in Pet Care Basics 293 - Last Update November 14, 2025

I'll be the first to admit it: for years, the thought of trimming my dog's nails sent a shiver down my spine. The 'click-clack' on the hardwood floors was a constant reminder of a task I dreaded. I was terrified of hurting him, of cutting the quick, and turning a simple grooming task into a traumatic event for both of us. After a few stressful and expensive trips to the groomer, I decided I had to learn to do this myself, calmly and confidently.
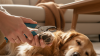
Getting the right tools for the job
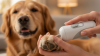
My first mistake was buying the cheapest clippers I could find. They were dull and crushed the nail instead of cutting it cleanly, which I quickly learned is very uncomfortable for a dog. I've since tried both the 'guillotine' style and the 'scissor' style clippers. For my medium-sized dog, I personally prefer the scissor-style clippers. They feel sturdier and give me more control. Some of my friends swear by nail grinders, which file the nail down. They're great for a smooth finish and for dogs with black nails where the quick is hard to see, but the noise and vibration can take some getting used to for the dog. The key is to find what you and your dog are most comfortable with.
Creating a calm and positive environment
I realized that my own anxiety was making my dog anxious. So, I completely changed the routine. Now, we don't just jump into a nail trim. I wait for a time when he's already relaxed, maybe after a long walk or when he's sleepy in the evening. I get the clippers out and let him sniff them, giving him a high-value treat. I do this without even trying to cut a nail. We sit on the floor in a comfortable, well-lit spot. The whole vibe is 'this is no big deal'.
The technique: how i actually do it
Once we're both calm, I get to work. It's a process built on trust and patience, not speed. I never try to do all four paws in one sitting if he's not feeling it.
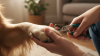
Holding the paw correctly
I hold his paw firmly but gently, with my thumb on the pad of the toe and my forefinger on the top of the toe over the nail. This gives me control and helps separate the toes. I make sure his fur is pushed back so I have a clear view of the entire nail.
Identifying the quick
If your dog has light-colored nails, you're in luck. You can often see the pinkish part inside the nail called the quick – it contains blood vessels and nerves. You want to cut a few millimeters away from it. For my dog's dark nails, it's trickier. I learned to look at the cut surface of the nail. As you get closer to the quick, you'll see a small, dark circle appear in the center. That's my signal to stop.
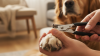
The 'little by little' approach
This was my biggest breakthrough. Instead of trying to take off a big chunk, I trim off tiny slivers from the tip of the nail. I make small, confident cuts. This approach is much safer, especially with dark nails, and it prevents you from accidentally cutting the quick. One or two nails a day is better than a stressful marathon session.
What to do if you accidentally cut the quick
It has happened to me, and honestly, I panicked more than my dog did. The most important thing is to stay calm. The bleeding often looks worse than it is. I always keep styptic powder on hand. You just apply a pinch to the nail tip with firm pressure, and it stops the bleeding almost instantly. Cornstarch or flour can also work in a pinch. After it happened, I gave my dog lots of praise and a special treat, and we stopped for the day. He's since forgotten all about it. Remember, this is what worked for us, and if you're ever in doubt, a quick call to your vet or a professional groomer is always a good idea.