Home Grooming Nail Trimming for Dogs
by admin in Pet Care Basics 138 - Last Update November 18, 2025
I\'ll be honest, the sound of dog nail clippers used to fill me with as much dread as it did my dog. For years, every nail trim was a stressful ordeal, whether at the vet or at home. It felt like a wrestling match, and I always worried I was hurting him. It took a lot of trial, error, and patience, but I finally figured out a system that turned this dreaded chore into a calm, manageable, and even bonding experience. It wasn\'t about finding a magic tool; it was about changing my entire approach.
Choosing the right tools for us
I started with the guillotine-style clippers everyone recommended, but I found them clumsy and I could never see exactly where I was cutting. For my medium-sized dog with thick, dark nails, this was a recipe for anxiety. After one too-close-for-comfort trim, I switched to the scissor-style clippers. For me, they offered so much more control and visibility. I also invested in a small, quiet nail grinder. We don\'t use it every time, but it\'s fantastic for smoothing sharp edges after a clip and for taking off tiny amounts when we\'re getting close to the quick.
What you\'ll need to get started:
- High-Quality Clippers or Grinder: Choose what feels most comfortable and controllable in your hand. Sharp clippers are a must; dull ones can crush the nail, which is painful.
- Styptic Powder: This is my non-negotiable safety net. If you accidentally cut the quick, this will stop the bleeding almost instantly. Don\'t start a trim without it nearby.
- High-Value Treats: I\'m not talking about their regular kibble. I use small pieces of chicken or cheese—something my dog truly loves and only gets during our \'spa sessions.\'
- Good Lighting: I learned this the hard way. Trying to trim dark nails in a dim room is incredibly risky. I either sit near a bright window or use a headlamp to get a clear view.
The step-by-step process I use
The biggest change for me was realizing this isn\'t a race. We sometimes only do one paw per day, and that\'s perfectly okay. The goal is a positive experience, not a perfect pedicure in five minutes.
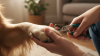
- Set the mood: I wait until my dog is already calm and relaxed, usually after a long walk. We sit on the floor together on his favorite rug, away from household noise.
- Paw handling first: Before the clippers even come out, I gently hold and massage his paws, pressing on each toe. I give him a treat for letting me do this. We did this for a week before I even attempted a trim.
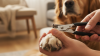
- One nail at a time: I gently but firmly hold one paw and isolate a single toe. I use my thumb to gently push back any fur.
- Identify the quick: On his few light-colored nails, it\'s easy to see the pink \'quick.\' On his dark nails, I look for a small, dark circle in the center of the nail as I trim. This circle means I\'m getting close to the quick and it\'s time to stop. My rule is to trim tiny slivers at a time, not one big chunk.
- Clip and treat: I make a quick, confident snip off the very tip of the nail. The second the clipper moves away, he gets a treat and praise. We might do one more nail, or we might stop there for the day, depending on his comfort level.
- Smooth the edges: If needed, I\'ll use the grinder for just a second or two to smooth any rough spots.
What I learned about cutting the quick
It has happened to me, and it will likely happen to you at some point, no matter how careful you are. The first time, I panicked. My dog yelped, and I felt terrible. But panicking only makes it worse. Now, I know to stay calm. I immediately dip the nail into my little pot of styptic powder, apply gentle pressure for about 30 seconds, and give my dog lots of comfort and a jackpot of treats. We end the session there on a positive note. Remember, it\'s not a major injury, but it\'s important to be prepared. This is my personal experience, and I always recommend you chat with your vet or a professional groomer for a demonstration if you\'re unsure.