Performing Pet CPR Chest Compressions Correctly
by admin in Pet Care Basics 162 - Last Update November 16, 2025
I’ll never forget the feeling of my heart pounding in my chest during my first pet first aid certification class. We were practicing on dummies, but the weight of the responsibility felt so real. The instructor told us that knowing the correct way to perform chest compressions could be the most critical physical skill in a pet emergency, and it’s something I’ve practiced mentally ever since. It\'s a scary topic, but being prepared has given me a sense of calm I wouldn\'t have otherwise.
Understanding the goal of chest compressions
Before we get into the \'how,\' it’s important to understand the \'why.\' When a pet\'s heart stops, chest compressions are what we do to manually pump blood to their vital organs, especially the brain and lungs. We are, quite literally, acting as their heart. It\'s an exhausting, physically demanding task, but it’s our best shot at keeping them with us until we can get to a veterinary professional. Remember, this information is meant to empower you in an emergency, but it is not a substitute for professional veterinary care or a hands-on training course, which I wholeheartedly recommend for every pet owner.
Positioning your pet for CPR
First, check for responsiveness and breathing. If there is none, and you can\'t find a pulse, you need to begin CPR immediately. Lay your pet on their right side on a firm, flat surface. This leaves their heart, which is located on the left side of the chest, facing up towards you.
- For most dogs and cats: Their right side down is the standard.
- For barrel-chested dogs (like Bulldogs or Pugs): It\'s sometimes more effective to perform compressions with them lying on their back.
Getting this initial positioning right is something I had to practice a few times on the dummy to make it feel natural. In a panic, you want it to be muscle memory.
Correct hand placement and technique
This is where size really matters. The technique I learned for a big Golden Retriever is very different from the one for a small cat.
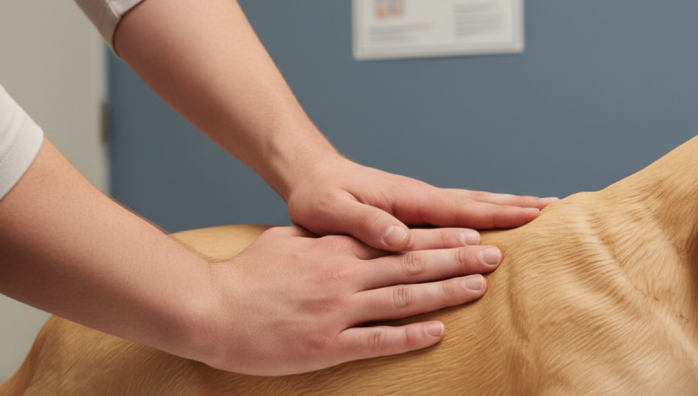
For medium to large dogs (over 30 lbs / 14 kg)
Place the heel of one hand directly over the widest part of their chest, right behind their elbow. Place your other hand on top and interlock your fingers. With your arms straight and your shoulders directly over your hands, you\'ll use your body weight to compress the chest. This was the hardest part for me; you have to push much harder than you think.
For small dogs and cats (under 30 lbs / 14 kg)
For these smaller animals, you can use a one-handed technique. You can either place the heel of one hand over the heart or use what\'s called the \'thoracic squeeze\' method. For this, you wrap your hand around their chest so your thumb is on one side and your fingers are on the other, right over the heart. You then squeeze your hand to compress the chest.
The rhythm and depth of compressions
This is the final, crucial piece of the puzzle. Getting the rate and depth right is what makes the compressions effective.
- Rate: The target is 100 to 120 compressions per minute. The easiest way I remember this is to press to the beat of the song \"Stayin\' Alive.\" It sounds a bit morbid, but it’s a medically-recognized trick that works perfectly for maintaining the right rhythm.
- Depth: You should compress the chest to about 1/3 to 1/2 of its total depth. It feels like a lot, and it\'s natural to be scared of hurting them, but ineffective compressions won\'t circulate blood. Be firm and intentional.
You should perform 30 chest compressions followed by 2 rescue breaths, and continue this cycle. Honestly, it\'s exhausting, but don\'t give up. Continue CPR until your pet starts breathing on their own, or until a veterinarian can take over. My hope is that you never have to use this skill, but knowing it is one of the greatest gifts you can give your beloved companion. I always recommend discussing emergency plans with your vet before you ever need one.