Brushing Your Pet's Teeth at Home
by admin in Pet Care Basics 148 - Last Update November 21, 2025

I’ll be honest, for years I thought \'doggie breath\' was just a quirky, unavoidable part of having a dog. I’d laugh it off. It wasn\'t until a routine vet visit for my older Golden Retriever that the reality of pet dental health hit me hard. The vet showed me the significant tartar buildup and explained how it could lead to much more serious issues than just bad breath. That was my wake-up call. I knew I had to learn how to tackle this at home, not just for my dog, but for my slightly more-skeptical-of-everything cat, too.
Why at-home dental care is non-negotiable for me now
Once I started researching, I was shocked. Poor dental hygiene doesn\'t just stay in the mouth. The bacteria from plaque and tartar can get into the bloodstream and affect vital organs like the heart, liver, and kidneys. Professional cleanings under anesthesia are fantastic and necessary, but they can be expensive and carry risks, especially for older pets. I see at-home brushing as the daily maintenance that makes those professional cleanings less frequent and less intensive. It\'s truly a cornerstone of their preventative health care.
The tools that made a difference
Getting started felt overwhelming, but I quickly learned you only need a few key things. Forget the human stuff; it\'s often toxic to pets.
- Pet-specific toothpaste: This is the most important part. They come in pet-friendly flavors like poultry or beef. I found the enzymatic kinds work best, as they help break down plaque even in the spots the brush can\'t quite reach. Never, ever use human toothpaste—the fluoride and xylitol can be very dangerous for them.
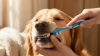
- The right brush: I\'ve tried a few things. For my dog, a dual-headed toothbrush with a long handle works best to reach the back molars. For my cat, a small, soft finger brush was the only thing she would tolerate. It’s all about finding what your pet is most comfortable with.
My step-by-step approach to brushing
Patience is everything. I learned the hard way that you can\'t just go for it on day one. This process took me a couple of weeks of daily, short sessions to get them comfortable.
For my dog
- Introduce the paste: I started by just putting a dab of the poultry-flavored toothpaste on my finger and letting him lick it off. I did this for a few days so he saw it as a treat.
- Touch the gums: Once he liked the paste, I’d put it on my finger and gently rub his teeth and gums. Lots of praise followed!
- Introduce the brush: Next, I let him lick the paste off the toothbrush. Then, I gently brushed just one or two of the front teeth and stopped. I kept sessions under a minute.
- The full routine: Over time, I worked my way up to brushing the outside of all his teeth in small, circular motions. I focus on the outside surfaces, as that\'s where most tartar builds up.
For my much fussier cat
Cats are a different story, and I had to adjust my expectations. The key for my cat was speed and making it part of a routine she already enjoyed, like our evening cuddle time.
- Flavor is king: Finding a toothpaste flavor she loved was critical. For her, it was a malt flavor.
- The finger brush: The big brush was too intimidating. A soft silicone finger brush was much less invasive.
- Quick and positive: I followed the same slow introduction as with my dog, but our sessions are still very short—maybe 30 seconds total. I focus on the outer canines and premolars and give her a favorite treat immediately after. Some brushing is always better than none.
This routine is now just another part of our day. It has made a visible difference in their oral health and gives me peace of mind. While this is what worked for us, I always think it\'s a good idea to chat with your vet. They can show you the best technique for your specific pet and recommend products they trust.